Sidebar
Table of Contents
This addon requires Cherry core, a free store addon. get it here.
Cherry Telegram
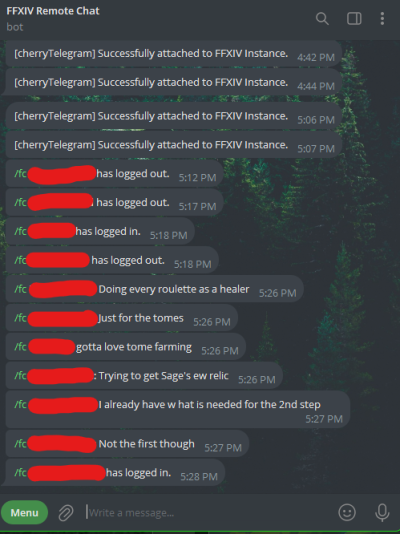
Seamlessly connect Final Fantasy XIV's chat system with your Telegram account, ensuring you never miss a beat, even when you're not in the game. Type messages directly into Telegram, and watch as they're instantly relayed into the game's chat, allowing you to communicate with your teammates as if you were there. Plus, stay updated with real-time notifications of in-game events and conversations.
Features
Full chat log support
- Transfers all chat messages to telegram
- Filter between all messages or only messages from the categories you want to see
- Auto converts text emojis from chat to telegram emojis
Full messaging support
- Use the same commands you do in-game to talk to whoever you want, whether they're in your free company, your party, linkshell, or any other chat mode in the game.
- Activate emotes remotely, make your character dance from your cell phone.
Leverage Telegrams Full Power
- In-game links are automatically converted to website previews in the telegram client, bringing to life links shared by everyone around you.
- Full support for custom Telegram response buttons.
- Full custom registered command support.
Add-on Support
- Full support for other authors' add-ons to leverage the Telegram engine via registered mods. (Requires implementation by the add-ons author)
First-Time Setup
This add-on utilizes Telegram's bot technology to transfer messages back and forth to the game. Telegram is free and creating a bot is free as well as easy. No coding skills are needed. Follow the instructions carefully to ensure that you don't have any issues.
1. Create a Telegram Account
This add-on requires that you have a Telegram account. Telegram accounts are free and easy to sign up for.
2. Create a Telegram Bot
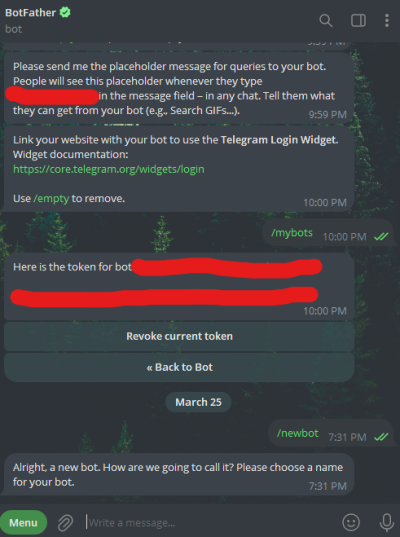
Follow this link to create your bot Step-by-step Telegram bot creation. The username and description of the bot can be anything you choose and do not affect the operation of the add-on. The important part of this is to get the bot token. Keep the bot token safe as we will be using it in later steps.
Once the bot is created and you have obtained the bot token and while you're still interacting with @botfather, use the
/setjoingroups
command to turn off group access. Cherry Telegram will only respond to chats directly from the Telegram username that you provide to it, so there's no worry that other users will be able to communicate with your game or see your in-game messages, But using the set join groups command will ensure that other users don't try to add it to a group and interact with it in that fashion.

2. Addon Installation / Initial Settings
- Install both this addon as well as Cherry Core.
- Enter the game.
- Open the addon by going into MMOminions main menu and selecting “Cherry Telegram”
- Enter your bot token exactly how you got it with no extra characters or trailing spaces.
- Enter your Telegram username. THIS IS CASE-SENSITIVE
- Enable “Listen for Telegram commands”
- Enable “send messages to Telegram”
- Not required but I recommend that you enable “Auto-connect to last chat instance”
Once those settings are entered in-game, go into Telegram and start a conversation with your bot. You do this by entering the search section and typing in an “@” and your bots username: Example “@ffxivchattingbot”. Send the
/start
Command to your bot to start interacting with the game client. If you don't enable “Auto-connect to last chat instance” then you will need to send the start command every time you reopen the game.
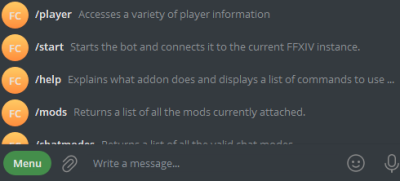
Once the bot has been connected for a few minutes you should see a list of commands appear in telegram:
Mod Setup
Any 3rd party add-on developer can develop an add-on that connects to Cherry Core. That add-on can then send and receive messages and commands from any cherry communication add-on. Cherry Core provides a simple interface for allowing the 3rd party add-on to communicate and at the same time gives the end user full control over what messages they receive and to what platform the messages are routed.
Follow the instructions below to build your first mod.
Download cherry_modchattest.zip And install it in Mmo Minion in the LuaMods folder. As long as you have Cherry Core installed and at least one communication client installed and configured, the sample code should work out of the box.
CherryConnect API
The Cherry Connect API is fairly simple and is accessed by the global variable
CherryConnect
Communication with the code is done in two ways: Callback functions and immediate result structs. The immediate function results will notify the user that the initial step taken was either successful or was an error. This handles cases where there are no clients registered or some other local issue happens. Further results and errors will be communicated in the callback function once the bot hears back from the communication Clients.
Cherry Connect functions are explained below:
CherryConnect.Register
Usage: Registers a mod through the Cherry Connect platform to enable an add-on to send/receive messages and commands with a user's installed communication clients.
CherryConnect.Register(author, cmd_func, mod_name, desc)
- author - required
- The name of the author of the mod.
- cmd_func - required
- The function that will be called anytime the user communicates with one of the clients. The function signature must be function(result)
- mod_name - required
- This is the name of the mod and will also become the command that the user will use to communicate with the mod.
- desc - required
- This helps the user understand what the purpose of the mod is and is visible in the mod section of each communication client.
returns
On errors:
{
   mode = result_modes.error,
   err_code = error.error_code,
   message = message,
}
See below for possible error codes and messages
On success:
{
   mode = "new_id",
   message = "MOD_ID",
}
Notes
The mod name cannot conflict with any other mod or command. Mods do not share a 1 to 1 relationship with an add-on, so a single add-on can register multiple mods. MOD_ID Will be used in all the other API calls to identify which mod is making the call. The MOD_ID must be saved for as long as Cherry Core is not unloaded or until the mod is unregistered. Once the mod is unregistered you must re-register the mod to access a new MOD_ID
CherryConnect.Unregister
Usage:
CherryConnect.Unregister(mod_id)
Unregisters the mod from Cherry Connect
- mod_id - required
- The id of the mod that is being unregistered
Notes Most of the time you will not need to unregister a mod. The mod will need to be re-registered anytime the addons are all reloaded and a new mod_id will be generated. If you're going to lose the mod_id and you need to re-register your mod without reloading Cherry Core, Then you will need to unregister the mod.
CherryConnect.Message
Usage:
CherryConnect.Message(mod_id, message)
Sends a message to all clients that the user has allowed the message to be sent to.
- mod_id - required
- The id of the mod that has been registered
- message - required
- The message to the user
returns
On errors:
{
   mode = result_modes.error,
   err_code = error.error_code,
   message = message,
}
See below for possible error codes and messages
On success:
{
   mode = "success",
   message = "Message sent.",
}
Notes Sends a message to the user. This function does not allow a return function because there's no way for the user to directly reply to the message. If you need to give the user options to select then use the CherryConnect.MessageOptions function.
CherryConnect.MessageOptions
Usage:
CherryConnect.MessageOptions(mod_id, options, message, callback_func)
Sends a message that includes options that the user can select.
- mod_id - required
- The id of the mod that has been registered.
- options - required
- A list of options that the user has to select from. The options are in the format of: {“Option1”,“Option2”,“Option3”,…}
- message - required
- The message to the user.
- callback_func - required
- The function that gets called when the user selects an option. The function is in the format of: function(option, callback_id)
returns
On errors:
{
   mode = result_modes.error,
   err_code = error.error_code,
   message = message,
}
See below for possible error codes and messages
On success:
{
   mode = "success",
   message = "Message sent.",
}
Notes The option that is returned will exactly match one of the options that was sent. the callback_id should be immediately used when an option is selected. Some clients use this data to give the user ui feedback.
CherryConnect.MessageResponse
Usage:
CherryConnect.MessageResponse(mod_id, callback_id, message)
Let's the user's client know That the option has been received successfully
* mod_id - required
- The id of the mod that has been registered.
- callback_id - required
- The callback ID that was given from a successful option selection of the CherryConnect.MessageOptions function
- message - optional
- A simple message to the user acknowledging that the option was selected.
returns
On errors:
{
   mode = result_modes.error,
   err_code = error.error_code,
   message = message,
}
See below for possible error codes and messages
On success:
{
   mode = "success",
   message = "Message sent.",
}
Notes This should be used immediately after an option is selected from CherryConnect.MessageResponse to provide a good experience for the end user to understand that the option that they selected was acknowledged.
Main Communication function
The function that is passed to CherryConnect.Register will be the function that which most user messages and commands will be routed. The exception would be CherryConnect.MessageOptions where the user-selected option will be routed directly to the specially supplied function.
The When the user sends a message or command that is routed to cmd_func The signature will be function(result). The result will either be an error or a message result:
On errors:
{
   mode = result_modes.error,
   err_code = error.error_code,
   message = message,
}
See below for possible error codes and messages
On success:
{
   mode = "message",
   message = "FULL_USER_MESSAGE",
}
Results & Errors
Result Modes
result_modes = {
   new_id = "new_id",
   success = "success",
   error = "error",
   message = "message",
}
Error Codes
errors = {
	setting_commands = {
		error_code = 1001,
		message = "Error Setting Commands."
	},
	missing_fields = {
		error_code = 1002,
		message = "Please provide an author, command function, mod name, and description."
	},
	mod_name_spaces = {
		error_code = 1003,
		message = "Mod name cannot contain spaces."
	},
	cmdFunc_not_function = {
		error_code = 1004,
		message = "[cmdFunc] must be a function."
	},
	duplicate_mod = {
		error_code = 1005,
		message = "Mod already registered. Please use a different author / name combination."
	},
	mod_not_found = {
		error_code = 1006,
		message = "Mod not found."
	},
	id_not_supplied = {
		error_code = 1007,
		message = "ID not supplied."
	},
	mod_not_allow_posting = {
		error_code = 1008,
		message = "Mod does not allow posting."
	},
	message_not_supplied = {
		error_code = 1009,
		message = "Please supply a message."
	},
	no_registered_clients = {
		error_code = 1010,
		message = "The user has not registered any communication clients."
	},
}
Troubleshooting
If you have any questions or need help, please visit the Cherry discord server: Cherry Discord


