
Sidebar
kitanois_usp_lanner_farm
Table of Contents
Kitanoi’s USP Lanner Mount Farm
This addon is no longer for sale. Current users can continue using. New users can look into Dungeon Framework to see if that supports what they need.

What it does:
Kills the (HW) primal you have set on the party leader over and over until stopped farming the mounts.
Undersized Party only.
Loots the chest at the end using the following logic:
- If you have the mount or whistle, pass the whistle
- If you have the piece of gear, pass
- If you don’t have the gear, need if you can, else greed.
You need to ensure you have inventory space on all characters.
Handles cross world parties. If you are NOT the leader, check NON-LEADER.
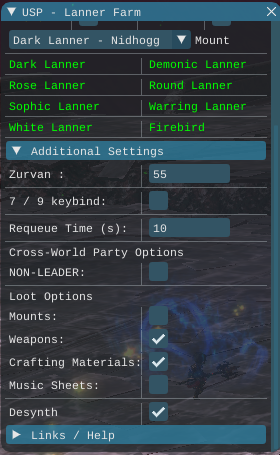
Desynth: Will attempt to desynth ALL weapons that drop from the primals. (Currently only working for items in inventory (hoping to get it working from armory soon))
Will only desynth if you have desynth option unlocked. It does NOT make any other checks before desynthing. It does NOT consider your desynth level before attempting.
Uses when: Not in combat and No target and when option is selected (global variable, it is saved) and timesince last desynth > 8 seconds
What it does NOT do:
Does NOT support Duty Finder.
The firebird quest, it is named in the list of mounts, but you need to do the quest manually. It is simple, go to Idleshire and talk to the quest giver next to the Aetherite, next talk to the Wandering Minstrel in Idleshire, and finally go to the hand in point.
Automatically farm all mounts like the Pony Farm. This is because of needing 4 characters and not being able to easily detect which each character has got.
This addon CANNOT solo any of the primals. You need either 4 characters with bot subscriptions, or you plus a group of friends all with a bot subscription and the addon.
Skill Profiles:
Testing on this addon has been done using MCR, this means certain fights, such as Thordan and Bismarck, I turn off provoke so adds are kept separate. I do not have such control over standard profiles or ACR.
For Nidhogg, smart DOTs need to be turned off, or you will likely fail until you have a high enough echo. This is due to the skill profile trying to DOT an add that cannot be and makes you fail the DPS check.
Healers need to have curing available with or without a target and in and out of combat. Some of the fights you will be taking damage but not have a target. MCR Astrologian was great for this, one set as barrier stance, the other on healer/regen stance. Lightspeed is also a huge help when you are moving a lot.
Requirements:
Each fight has different requirements, please ensure you fully read before purchasing the addon as you will need up to 4 accounts to be able to complete every fight. Characters must be level 80.
Please ensure you use the trial time to verify your characters and set ups can complete each fight. I'd suggesting in the following order as it is based on the difficulty.
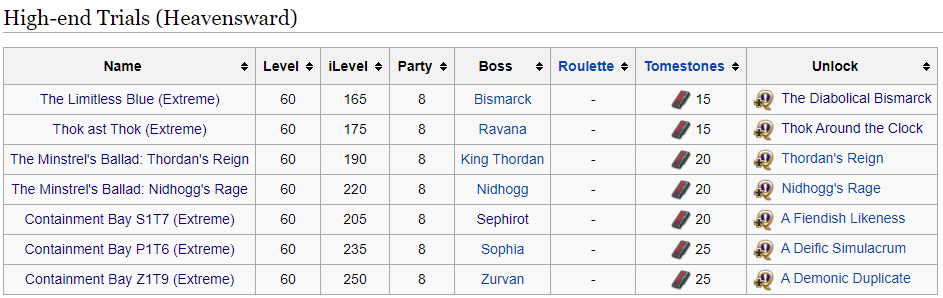
Zurvan | Sophia | Nidhogg > Sephirot > Thordan > Bismarck > Ravana
Unlock Quests: https://ffxiv.consolegameswiki.com/wiki/Trials#Trials_.28Heavensward.29
UI
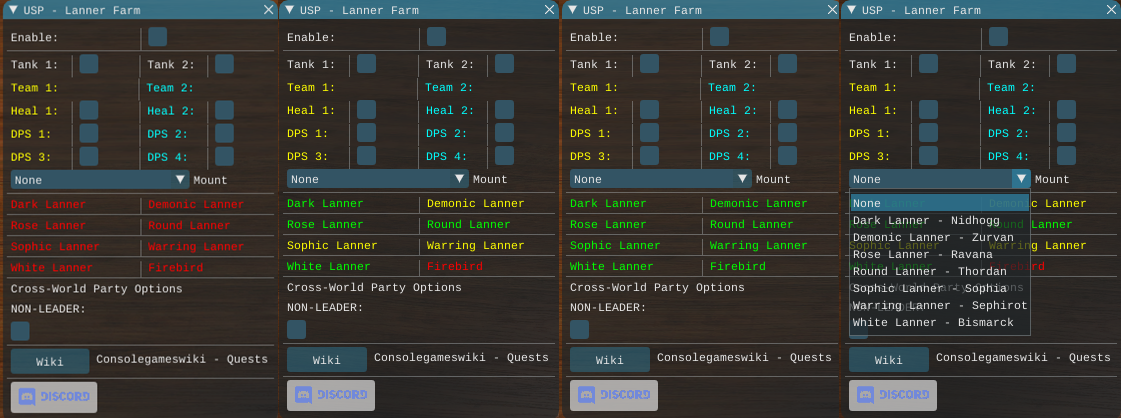
- Enable: enable/disable addon
- Each character running the addon will need to be set with a different option below, this is for certain mechanics where splitting up is required such as tethers on Thordan:
- Tank 1 / 2
- Heal 1 / 2
- DPS 1 / 2 / 3 / 4
- Drop down box to select the Primal to fight (Only the leader needs to select, all other party members should click none)
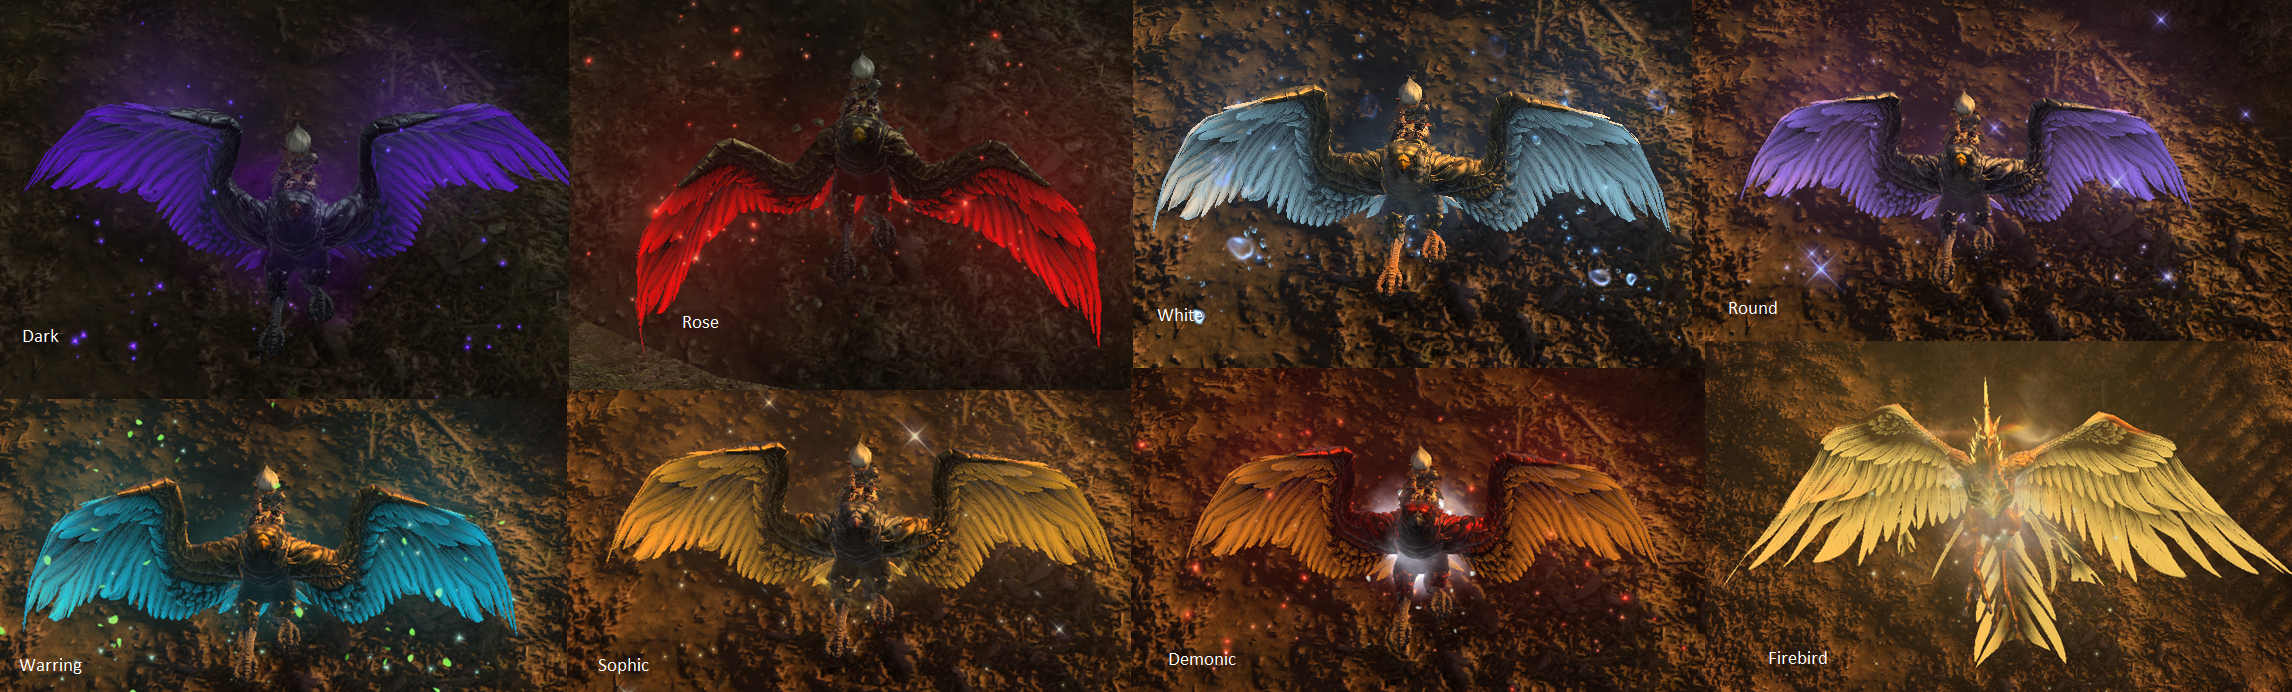
- Color indicator displaying which whistles and mounts you have:
- Red: Haven't learned
- Yellow: Have the whistle
- Green: Learned to summon the mount
- Cross-World Party Options, click the Non-leader if in a CWP and not the leader
- Wiki button will take you to the ConsoleGamingWiki with a list of quests needed to use the addon.
- Discord Button
Desynth: Will attempt to desynth ALL weapons that drop from the primals. (Currently only working for items in inventory (hoping to get it working from armory soon))
Will only desynth if you have desynth option unlocked. It does NOT make any other checks before desynthing. It does NOT consider your desynth level before attempting.
Uses when: Not in combat and No target and when option is selected (global variable, it is saved) and timesince last desynth > 8 seconds Newest UI as of 2020/01/29
Bismarck
Min. Reqs: 2 tanks
Ravana
Min. Reqs: 1 Tank 1 Healer
Thordan
Min. Reqs: 2 tanks 1 healer and 1 other job
Nidhogg
Min. Reqs: 2 tanks 2 healers
Sephirot
Min. Reqs: 2 paladins 2 healers
Zurvan
Min. Reqs: 2 paladins 2 healers
Possible with 1 tank, 1 healer, 2 dps with additional setting at 55% or below. (ilvl430) Broken Seal MUST be skipped for this to work.
Sophia
Min. Reqs: 2 tanks 2 healers
Skill profiles tested using are mostly MCR, though in Nidhogg I used one char on a standard skill profile as it allowed healing at higher percentages which is needed due to the amount of AOEs.
Fights and Mechanics
Color Guide:
red: Not Perfect. This is either due to Minion not being able to detect the mechanic or due to skill profiles not being able to be fully controlled. The mechanic will be handled in the best way to mitigate damage / knock back.
orange: The mechanic is ignored. This will either be because it is a non-issue, or due to phases being skipped.
green: Mechanic is handled correctly with no issues.
blue: Not coded.
Bismarck
Phase 1: Kills adds then carapace
- Ground AOE: Ignored Damage is too low, and no knock backs affect level 80
- Harpoons: Handled
Phase 2:
- Splits two adds up and kills them
- Kills subsequent adds
- Kills Bismarck (If damage is too low, the addon will walk you off of Bismarck when it begins to shake to ensure you do not die)
Ravana
- Tapasya: Handled Moves to the sides to avoid getting hit all 3 times
- The Seeing X: Handled Move to the correct position to avoid the shielded sides
- Prelude to Liberation (ground line aoes): Not perfect Minion cannot see these, so characters will be moved to individual locations based on the role set in the addon to minimise damage.
- Liberation: Handled Stacks behind
- Swift Liberation: Not Perfect Minion cannot detect the icons to see which characters have the icon, so characters will be moved to individual locations based on the role set in the addon to minimise damage.
- Final Liberation: Handled Damage no longer an issue, though you should not really see this mechanic as phases get skipped due to damage output.
- Pillars of Heaven: Handled Automatic positioning between Ravana and a wall so that you don’t get knocked off.
- Adds (butterflies): Handled but always skipped with 4 characters.
Thordan
- Ascalon’s Might (Frontal Cleave): Handled Avoided by all but tank
- Dragon’s Gaze: Handled Will move character to face away.
- Tethers: Handled
- Conviction Towers: Ignored
- Spiral Thrust (AOE after first Knight): Handled
- Two Knights phase, tanks will pull a knight each to a separate location to stop them from tethering.
- Dimensional Collapse + Spiral Pierce + Hiemal Storm: Handled
- Meteors: kills meteors, ignores all other mechanics.
- Spear of Fury: Handled
- Phase 6: Conviction Towers + Dragon's Gaze + Heavy Impact: You should have killed before this phase, or at the very least kill Thordan as it begins.
Nidhogg
SMART DOTS MUST BE TURNED OFF FOR THIS FIGHT OR YOU WILL LIKELY WIPE DURING FANG AND CLAW PHASE
- Horrid Roar: Handled
- Cauterize: Handled AFTER Horrid Roar has been handled to minimise chance of Hysteria.
- Hot Wing / Hot Tail: Handled, though should only occur once per fight.
- Adds phase:
- Healer one will bait the shadow dragon avoiding all the attacks from it.
- Each tank will tank an add, healer one and two will dps
- Geirskogul: Handled Baited and avoided at a safe spot
- Fang and Claw phase:
- Only blue nail is killed this phase, ENSURE SMART DOTS ARE OFF.
- After blue nail is killed, will focus Nidhogg to force skip the intermission phase.
- Heal through the AOE when red self-destructs
- Intermission phase is not coded. You will skip this phase provided enough damage is done to Nidhogg.
- Akh Morn: Handled
- Bomb phase semi-ignored as you will only get hit by one bomb and the damage is negligible.
Sephirot
- Ein Sof (Green Puddles): Handled Players move to predefined positions to avoid damage.
- Fiendish rage: Handled utilising the safe spots used in Ein Sof, the two players getting hit will not hit others.
- Ain / Ratzon (phase 1): Ignored – Skip the phase.
- Adds: Handled
- Yesad: Handled avoids all except one during a tower phase
- Orange / Blue debuff placement: Handled
- Towers: Handled (only orange debuffed go in them) or tank when no debuffs
- Ratzon (phase 3): Handled safe spotted
- Earth Shaker: Not Perfect Minion cannot detect the icons to see which characters have it, so characters will be moved to individual locations based on the role set in the addon to minimise damage.
- Da’at with tethers: Handled Paladins will cover healers who have might, and use hallowed ground if they have might themselves.
- Pillars of Mercy: Handled
- Malkuth (knock back): Handled
- Storm of Words: Handled (add killed, and position in wind correctly)
Zurvan
- Phase 1: Handled
- Soar, Handled using individual locations as Minion cannot detect location of AOE. Nearly always skipped though as you will push 75% in phase 1.
- Biting Halberd: Handled
- Southern Cross: Handled
- Tail End: Handled
- Ciclicle: Handled
- Wave cannon: Handled
- Adds:
- Kills meteor casting first
- Positions between current target and the Wile to avoid fear, if target is Wile, will turn to avoid fear
- After broken seal is cast, and before the meteors land, the Paladins will cover the healers, and use Hallowed Ground. All characters should survive, though it will leave both tanks with 8 stacks of vulnerability. This cannot be avoided as Minion cannot detect the meteors being cast or get the position of, so I cannot handle the mechanic as intended.
- You will need to kill before the second Broken seal is cast.
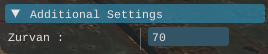
Zurvan now has an additional setting. This is for players using more than 4 characters. (This setting is saved, if you change party size, remember to change it).
4 Character, the 70 should work just fine. Any more characters, you will need to lower this number. This is to ensure you do not run off the platform before The Purge has been cast.
If running, 2 tanks, 2 healers, 2 DPS, I'd suggest 50. If running more, 40. Please note, you may need to adjust this until you get it running correctly.
Sophia
- Thunder 2 (Sophia and add): Handled
- Thunder 3 (Sophia and add): Handled
- Daughter's push attack: Handled
- Tethered add: Handled
- Adds phase:
- First Demiurge Handled Not Perfect can be a pain and knock you off, hence 2 healers to compensate if this happens. Due not being able to stop all skill profiles, I am limited to stopping you attack. If you get knocked off, one of the healers should be able to raise. If both fall off, it is likely a wipe.
- Second Demiurge, Handled
- First Demiurge: Handled
- Quasar:
- Meteors: Handled moves a bit, though damage is negligible
- Tilt: Handled and moves to side opposite the blue meteor. Does not take into account daughters location, or Sophia (additional damage) as the damage is low and the vulnerability stack doesn't matter.
- Black and White: Ignored usually skipped.
Support
For support or requests, please contact me on discord: https://discord.gg/FdFaTuj
kitanois_usp_lanner_farm.txt · Last modified: 2022/03/14 00:26 by kitanoi